Using Shaders to Draw Textures on a Terrain
Tutorial 17: Terrain Texture Layers
![]()
This DirectX 11 terrain tutorial will cover the implementation of terrain texture layers. The code in this tutorial builds on the previous terrain tutorials.
The pixel shader is an incredibly powerful tool that allows us to have complete control over how our terrain can look on a per-pixel basis. With this fine grained pixel control we can employ similar methods such as what Photoshop uses; layers and masks. Layers and masks will allow us to paint multiple texture layers over top of each other. This is just like how an artist would paint a terrain, layer by layer applying different colored paint each time.
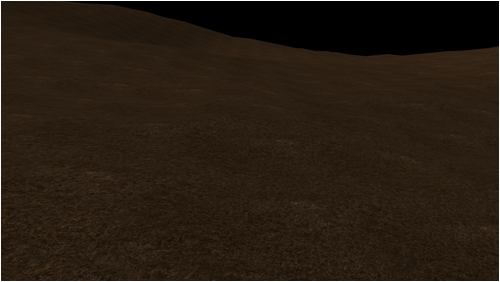
To illustrate this concept we will first draw a base layer of dirt for the terrain resulting in the following image:
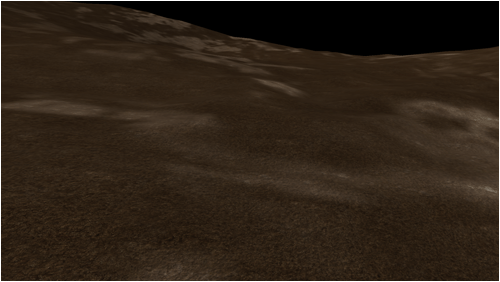
Next we will paint a second layer over top of the first one with a different dirt texture that is placed randomly using noise:
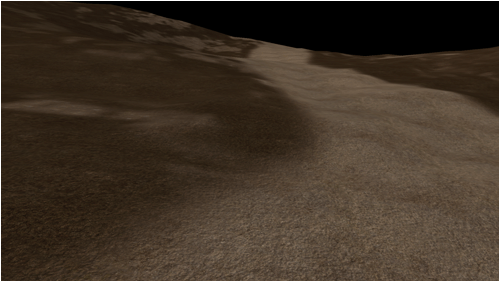
After that we can manually paint a third layer using a sand texture to create a sandy path over the terrain:
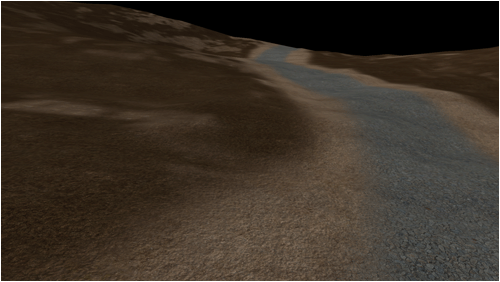
And finally we can manually paint another fourth layer using a brick texture to create a brick road on top of the sandy path:
We can continue adding layers until we have achieved the exact look we want for our terrain. All of these layers are painted on top of each other using what are called texture masks. Texture masks are usually created manually by an artist or they can be generated by using noise algorithms and other rendering techniques. For example the first texture mask used to place the second layer of dirt on top of the base layer looks like the following:
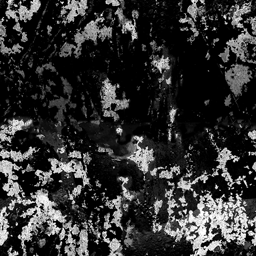
The white to black values represent the intensity or percentage amount that the new texture pixel should be added on top of the previous pixel.
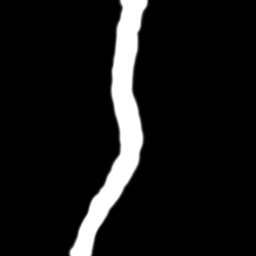
The second texture mask that was used to paint the sandy path was the following:
And finally the third texture mask that was used to paint the brick road on top of the sandy path was the following:

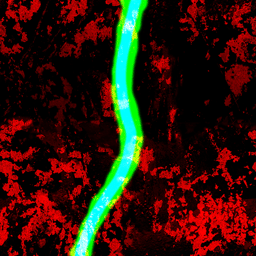
For the purposes of efficiency we packed them all into a single texture. The first layer went to the red channel, the second layer to the green channel, and the third layer to the blue channel. It creates the following image when viewed all together:
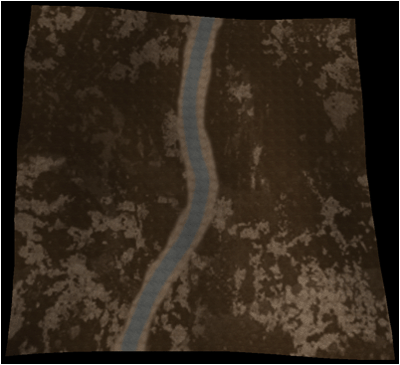
An overhead view of the resulting terrain looks like the following:
When we sample the texture in the pixel shader it is simple to pull out just the red, green, blue, or alpha channel and then use that as the per-pixel texture mask for a specific layer of terrain. This is the same idea as the alpha blending tutorial. You can pack four texture masks into a single RGBA texture (or even more if you are using a texture atlas). For every four layers of terrain you need to send in one RGBA combined texture mask into the pixel shader. So if we had 12 terrain layers we would need three RGBA textures to send in all the required texture masks to the pixel shader.
In the above image you will also note that the terrain is smaller than the other tutorials. To be exact it is using just a 32x32 height map. The reason for this is that the entire terrain now needs to be split up into 32x32 sections. Each 32x32 section will have its own texture mask. The resolution of the texture mask used for this tutorial is 256x256. This size covers the 32x32 well enough without using too much texture memory. Going smaller sacrifices a lot of detail however.
Splitting the terrain into these sections and assigning each section its own texture mask also incorporates well into the quad tree structure. Just the nodes will now be a fixed size (such as 32x32) that correlates to the texture mask. Note also that the texture mask textures will require a second set of texture coordinates since we are sampling for the 32x32 section, not per quad.
On a side note you can use this method to create a color map for this section of the terrain. Then for level of detail optimizations you can switch to rendering just the color map for the 32x32 section if this section becomes distant enough from the camera.
To start the code section of the tutorial we will look at the modified terrain HLSL shader.
Terrain.vs
//////////////////////////////////////////////////////////////////////////////// // Filename: terrain.vs //////////////////////////////////////////////////////////////////////////////// ///////////// // GLOBALS // ///////////// cbuffer MatrixBuffer { matrix worldMatrix; matrix viewMatrix; matrix projectionMatrix; }; ////////////// // TYPEDEFS // ////////////// The two input structures now have an additional texture coordinate member for the set of texture coordinates that are used to sample the texture layer masks out of the alpha texture.
struct VertexInputType { float4 position : POSITION; float2 tex : TEXCOORD0; float3 normal : NORMAL; float3 tangent : TANGENT; float3 binormal : BINORMAL; float2 tex2 : TEXCOORD1; }; struct PixelInputType { float4 position : SV_POSITION; float2 tex : TEXCOORD0; float3 normal : NORMAL; float3 tangent : TANGENT; float3 binormal : BINORMAL; float2 tex2 : TEXCOORD1; }; //////////////////////////////////////////////////////////////////////////////// // Vertex Shader //////////////////////////////////////////////////////////////////////////////// PixelInputType TerrainVertexShader(VertexInputType input) { PixelInputType output; // Change the position vector to be 4 units for proper matrix calculations. input.position.w = 1.0f; // Calculate the position of the vertex against the world, view, and projection matrices. output.position = mul(input.position, worldMatrix); output.position = mul(output.position, viewMatrix); output.position = mul(output.position, projectionMatrix); Send in both sets of texture coordinates to the pixel shader.
// Store the texture coordinates for the pixel shader. output.tex = input.tex; output.tex2 = input.tex2; // Calculate the normal vector against the world matrix only and then normalize the final value. output.normal = mul(input.normal, (float3x3)worldMatrix); output.normal = normalize(output.normal); // Calculate the tangent vector against the world matrix only and then normalize the final value. output.tangent = mul(input.tangent, (float3x3)worldMatrix); output.tangent = normalize(output.tangent); // Calculate the binormal vector against the world matrix only and then normalize the final value. output.binormal = mul(input.binormal, (float3x3)worldMatrix); output.binormal = normalize(output.binormal); return output; } Terrain.ps
//////////////////////////////////////////////////////////////////////////////// // Filename: terrain.ps //////////////////////////////////////////////////////////////////////////////// ////////////// // TEXTURES // ////////////// We have four color textures that will be used to render the terrain.
Texture2D colorTexture1 : register(t0); Texture2D colorTexture2 : register(t1); Texture2D colorTexture3 : register(t2); Texture2D colorTexture4 : register(t3); We have a single alpha texture which contains the 3 texture layer masks in the red, green, and blue channel.
Texture2D alphaTexture1 : register(t4); We use two normal maps to improve the look of the terrain textures by applying bump map calculations.
Texture2D normalMap1 : register(t5); Texture2D normalMap2 : register(t6); ////////////// // SAMPLERS // ////////////// SamplerState SampleType; ////////////////////// // CONSTANT BUFFERS // ////////////////////// cbuffer LightBuffer { float3 lightDirection; float padding; }; ////////////// // TYPEDEFS // ////////////// struct PixelInputType { float4 position : SV_POSITION; float2 tex : TEXCOORD0; float3 normal : NORMAL; float3 tangent : TANGENT; float3 binormal : BINORMAL; float2 tex2 : TEXCOORD1; }; //////////////////////////////////////////////////////////////////////////////// // Pixel Shader //////////////////////////////////////////////////////////////////////////////// float4 TerrainPixelShader(PixelInputType input) : SV_TARGET { float3 lightDir; float4 bumpMap; float3 bumpNormal; float lightIntensity1; float lightIntensity2; float4 textureColor1; float4 textureColor2; float4 textureColor3; float4 textureColor4; float4 alphaMap1; float4 baseColor; float4 color; Start by calculating the two bump maps. We use the first bump map for the dirt and sand textures since they are fairly similar and can share a single normal map. We use the second bump map for the stone path since it is fairly distinct looking and requires its own unique normal map.
// Invert the light direction for calculations. lightDir = -lightDirection; // Calculate the first bump map using the first normal map. bumpMap = normalMap1.Sample(SampleType, input.tex); bumpMap = (bumpMap * 2.0f) - 1.0f; bumpNormal = input.normal + bumpMap.x * input.tangent + bumpMap.y * input.binormal; bumpNormal = normalize(bumpNormal); lightIntensity1 = saturate(dot(bumpNormal, lightDir)); // Calculate the second bump map using the second normal map. bumpMap = normalMap2.Sample(SampleType, input.tex); bumpMap = (bumpMap * 2.0f) - 1.0f; bumpNormal = input.normal + bumpMap.x * input.tangent + bumpMap.y * input.binormal; bumpNormal = normalize(bumpNormal); lightIntensity2 = saturate(dot(bumpNormal, lightDir)); Now sample the four textures that will be used for rendering the terrain.
// Sample the color textures. textureColor1 = colorTexture1.Sample(SampleType, input.tex); textureColor2 = colorTexture2.Sample(SampleType, input.tex); textureColor3 = colorTexture3.Sample(SampleType, input.tex); textureColor4 = colorTexture4.Sample(SampleType, input.tex); Combine the four textures with their bump maps.
// Add the bump maps to their respective textures. textureColor1 = saturate(lightIntensity1 * textureColor1); textureColor2 = saturate(lightIntensity1 * textureColor2); textureColor3 = saturate(lightIntensity1 * textureColor3); textureColor4 = saturate(lightIntensity2 * textureColor4); Now sample the alpha texture which contains the three texture mask layers in the red, green, and blue channel. Note that we use the second set of texture coordinates as it maps over the entire 32x32 section and not just the individual quads.
// Sample the alpha map using second set of texture coordinates. alphaMap1 = alphaTexture1.Sample(SampleType, input.tex2); Paint the first layer of terrain. In this case it is the dark brown dirt texture. This texture must cover 100% of the terrain since it is the base layer and we don't want any black holes in our terrain. It also saves us from using up a texture mask layer.
// Set the base color to the first color texture. baseColor = textureColor1; Paint the second layer of the terrain on top of the base layer using the second light brown dirt texture and the texture layer mask from the red channel in the alpha map. We use the lerp function to do a linear interpolation of the two pixels which gives us the adding (painting on top of) result we are looking for.
// Add the second layer using the red channel of the alpha map. color = lerp(baseColor, textureColor2, alphaMap1.r); Now add the third layer on top of the previous result. We use the sand texture and the texture layer mask from the green channel of the alpha map.
// Add the third layer using the green channel of the alpha map. color = lerp(color, textureColor3, alphaMap1.g); Finally add the fourth layer on top of the previous result using the stone texture and the texture layer mask from the blue channel of the alpha map.
// Add the fourth layer using the blue channel of the alpha map. color = lerp(color, textureColor4, alphaMap1.b); return color; } Terrainshaderclass.h
//////////////////////////////////////////////////////////////////////////////// // Filename: terrainshaderclass.h //////////////////////////////////////////////////////////////////////////////// #ifndef _TERRAINSHADERCLASS_H_ #define _TERRAINSHADERCLASS_H_ ////////////// // INCLUDES // ////////////// #include <d3d11.h> #include <d3dx10math.h> #include <d3dx11async.h> #include <fstream> using namespace std; //////////////////////////////////////////////////////////////////////////////// // Class name: TerrainShaderClass //////////////////////////////////////////////////////////////////////////////// class TerrainShaderClass { private: struct MatrixBufferType { D3DXMATRIX world; D3DXMATRIX view; D3DXMATRIX projection; }; struct LightBufferType { D3DXVECTOR3 lightDirection; float padding; }; public: TerrainShaderClass(); TerrainShaderClass(const TerrainShaderClass&); ~TerrainShaderClass(); bool Initialize(ID3D11Device*, HWND); void Shutdown(); bool Render(ID3D11DeviceContext*, int, D3DXMATRIX, D3DXMATRIX, D3DXMATRIX, D3DXVECTOR3, ID3D11ShaderResourceView*, ID3D11ShaderResourceView*, ID3D11ShaderResourceView*, ID3D11ShaderResourceView*, ID3D11ShaderResourceView*, ID3D11ShaderResourceView*, ID3D11ShaderResourceView*); private: bool InitializeShader(ID3D11Device*, HWND, WCHAR*, WCHAR*); void ShutdownShader(); void OutputShaderErrorMessage(ID3D10Blob*, HWND, WCHAR*); bool SetShaderParameters(ID3D11DeviceContext*, D3DXMATRIX, D3DXMATRIX, D3DXMATRIX, D3DXVECTOR3, ID3D11ShaderResourceView*, ID3D11ShaderResourceView*, ID3D11ShaderResourceView*, ID3D11ShaderResourceView*, ID3D11ShaderResourceView*, ID3D11ShaderResourceView*, ID3D11ShaderResourceView*); void RenderShader(ID3D11DeviceContext*, int); private: ID3D11VertexShader* m_vertexShader; ID3D11PixelShader* m_pixelShader; ID3D11InputLayout* m_layout; ID3D11SamplerState* m_sampleState; ID3D11Buffer* m_matrixBuffer; ID3D11Buffer* m_lightBuffer; };
0 Response to "Using Shaders to Draw Textures on a Terrain"
Post a Comment